Connect to Display
There are 2 projectors in each room (for a total of 4 projectors). Each room has a projector console against the far (“front”) wall. To use a projector, both the projector console and a computer are required. Any fixed computer in the labs can be used, OR a laptop plugged into the console. From one console, it is possible to control either both projectors in the same room, or a combination of projectors in both rooms (see instructions below).
- Go to the touch screen of the console on the far wall.
- Touch the screen twice. A prompt appears to press the “ON” button in the AV cabinet to activate the projector.
- Press the green “ON” button; if you wish to control the projectors in both rooms (A253 and A251) from this console click on the red “Yes”, otherwise click on the green “No”.
- If you press Yes (because you wish to project the same information in both rooms) you will see a split screen. Select the projectors you would like to use.
- If you press No (because you wish to project the information on one or both of the projectors in the same room) - a split screen appears identifying the 2 projectors; one at the back and one at the front of each room. “Back” means by the entrance door, ”Front” is by the projector console.
- Choose a computer to work from: Laptop, and desktop PC instructions for connecting to the projector follow:
Laptop connection to display(s)
- If using a laptop, choose either VGA or HDMI, depending upon your laptop, on the console (button shows green when selected)
- Connect the appropriate cable from the console to your laptop.
- Depending upon the laptop and/or operating system you may have to enable projection on the laptop.
Desktop lab computer network connection to display(s)
- If using a desktop PC, first choose “Network” on the console (button shows green when selected).
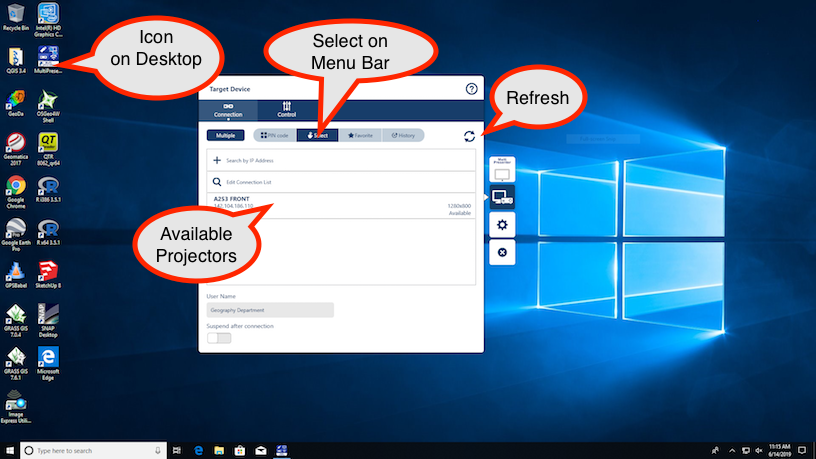
- Log into the computer using your netlink id and password.The screen will be empty (if info there, close out of it) – Either click on the MultiPresenter icon on the desktop or type ‘Multipresenter’ in the search bar at the bottom left of the screen. The program will start and appear as pictured below. If it does not make sure ’select’ is chosen on the menu bar. If no projectors are shown as available, ensure that one is on, and ‘network’ is selected on the podium controller. Clicking the ‘refresh’ (circular arrows) icon at the upper right will rescan for available projectors.
- Click on the desired projector in the ‘available projectors’ list – the projector is now ready.
- Be sure to DISCONNECT from when finished.